|
|
|
Article ID: 107
Last updated: 19 Aug, 2011
|
|
|
|
- Log in to the administration panel of your store, open the Administration tab and click on the Data feeds link.
- Click on the Add data feed button.
- Fill in the fields in the opened window:
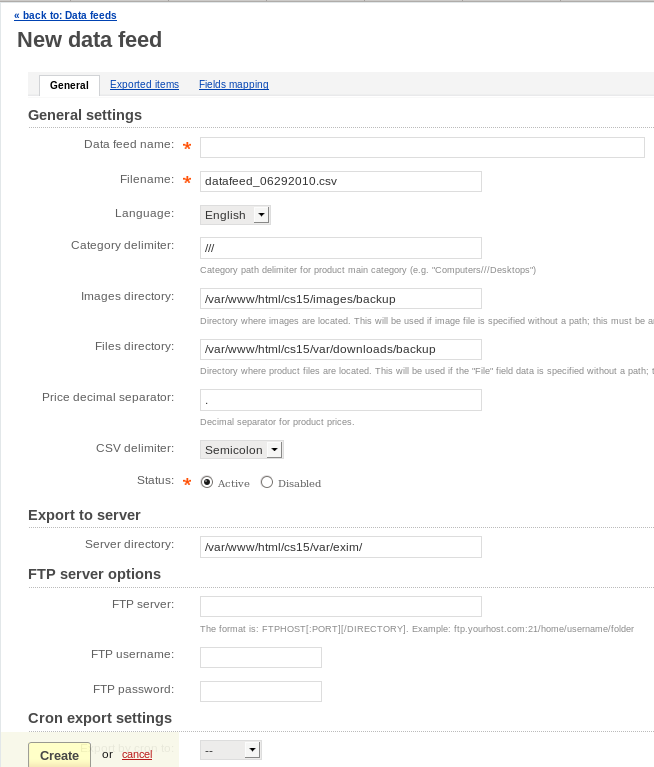
- Data feed name - Name of the data feed.
- Filename - Name of the exported file.
- Language - Language of the data in the feed.
- Category delimiter - Delimiter to separate child and parent categories.
- Images directory - Directory where product images are located. Used for images without a path specified.
- Files directory - Directory where files for downloadable products are located. Used for files without a path specified.
- Price decimal separator - Decimal separator for product prices.
- CSV delimiter - Delimiter to separate data in the feed.
- Status - Status of the data feed (Active or Disabled).
- Server directory - Directory on your server where the data feed will be exported to. Make sure the directory has writable permissions.
- FTP server - URL of the target directory on the FTP server to which the data feed must be uploaded.
NOTE: The URL that you enter into this field must be of the following format: host[:port]/directory. For example, ftp.example.com:21/home/johndoe/feeds.
- FTP username - Your username to access the FTP server.
- FTP password - Your password to access the FTP server.
- Export by cron to - Option to select where the data feed must be uploaded to: A directory on the current server or a third-party FTP server.
- Open the Exported items tab in the same window and add the necessary products and/or categories.
- Open the Fields mapping tab.
Use this tab to arrange a list of fields included in the data feed. Each field has the following attributes:
- Pos. - Position of the field relatively to the position of the other fields in the data feed.
- Field name - Name of the field.
- Field type - Meaning of the data in the field.
- Active - Checkbox to control the availability of the field.
- Click on the Create button.
|
© 2011 Magicdust Pty Ltd. All rights reserved.